![[about me]](aboutme.jpg)
![[powered by lisp]](lisp.jpg)
![[written with vi]](http://mariposabill.com/vi239.gif)
my bread recipe (makes four loaves)
version 4.02,
Tue Dec 30 01:52:59 PST 2025
Bill Evans, wje@acm.org
"I've heard it said that when you die you enter a room of bright light, and that you can smell bread baking just around the corner." -- Rick Bass, short story "Swans", collected in The Hermit's Story
Before we start, please keep in mind two things.
First, this is a living document. It is likely to change from time to time. If, when you most recently read (or printed, or downloaded) this narrative, the version number (which appears above) was less than 4.00, then the one you're reading now has significant changes.
In particular, this version introduces honey instead of refined sugar. It also uses all-purpose flour (supplemented by vital wheat gluten) instead of high-gluten flour, whose supply has become unreliable because of the blockade by Russia of Ukraine's winter wheat.
I have retained, for hysterical purposes, the version of this recipe that's just before the major changes. You can find it here.
Second, your kitchen is different from mine, your elevation is different from mine, and your climate is different from mine. Please consider doing a test run before you make any for family, company, or friends.
Third (yeah, I know, the Spanish Inquisition), you may discover things you want to share with me. Send me an electronic letter; my address is at the top of this page.
I started out with the revered classic KitchenAid stand mixer, model K5-A, which draws only 300 watts of power, and it served me well until I had to replace the extension cord, which would have been quite difficult. Here's the baby in question:
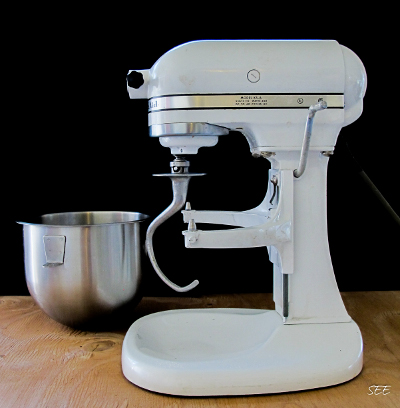
That's a five quart bowl. It's possible to buy a mixer with a smaller bowl, but don't do that. For baking two loaves at once, a 4 1/2 quart bowl isn't big enough.
In the picture, there's something that looks like a prop from the movie Peter Pan. That's a dough hook, and you'd be using one of those. It would also be handy to have a balloon whisk attachment (what KitchenAid currently calls an "eleven wire whip", though mine has only six wires), though you can make do with a hand whisk and a little elbow grease.
With this recipe, you need a strong mixer. I use a KitchenAid Professional 5 Plus, no longer available new. It has a 525 watt motor. If you go to the KitchenAid web page, they list several bowl-lift mixers; most of them aren't powerful enough. The last time I checked that page, a mixer's power could be listed either in watts or horsepower. Both are units of power, and one HP is about 750 watts.
In the KitchenAid listing for a mixer whose power was listed in HP, not watts, the Q&A section featured a question from someone: how many watts of power? KitchenAid staff answered that the mixer was rated only in HP. In other words, KitchenAid was more interested in showing that this was a mixer with hair on its chest, than in giving a useful answer. The questioner didn't know enough to do the conversion himself, and KitchenAid wasn't about to help him. A reminder: KitchenAid is out there to make money, and its pursuit of that goal rises to the petty inconveniencing of the public. KitchenAid is a force of nature. It is not your friend.
Some good news: Although you'll be briefly punching down the dough a couple of times, there'll be no initial kneading involved. Whew!
Baking pans. Do you need nonstick ones? Not really. After punching down a loaf for the final time, remove it from the pan and grease the pan, using a stick of frozen margarine (or butter) as a crayon; you'll be gradually peeling away the paper cover of the stick as you use it from loaf to loaf, just as you would a crayon; keep the stick in the freezer between uses. If this is too much trouble, you can try nonstick pans. The best I've found are Baker's Secret "Signature" (not "Essential") pans. But the nonstick finish on even those gave out on me after a year or so. A margarine crayon rescued me, and I was able to use even a finish-worn pan with no problem. (If you ever find yourself with bread stuck in a pan after baking, just pry at the sides and ends of it gently with a common table fork.)
Kitchen scale and microwave oven. Nuff said.
Cooling racks. Let the loaves cool on these at least an hour before slicing.
Bread knife. I use a manual one, but an electric one gives you convenient, consistent results.
Oven. Electric or natural gas or propane ought to work just fine. Mine's electric.
Ok, let's start. For the four loaves, you'll be mixing two batches, two loaves each. Put the dry ingredients for the first two loaves directly into the mixing bowl, and the dry ingredients for the other two loaves in a side bowl for putting in the mixer later. Into each of these bowls, put:
766 g all-purpose flour
40 g vital wheat gluten (but see the end of this recipe)
7 g instant yeast
12 g table salt
Don't be taking the flour straight out of the fridge or freezer. It needs to be roughly at room temperature.
Now that you've prepared both batches of dry ingredients, proceed to the ...
You prepared both batches of dry ingredients, side by side. You'll be preparing the first batch of wet ingredients, mixing it with the dry, and filling two loaf pans. Then you'll go back and do all this with the second batch. Here are the ingredients for each of the two batches:
400 g water
50 g honey
120 g canola oil (or 122 g; see below)
Add the honey (but not the canola oil) to a glass measuring cup containing the water. You'll want to mix the two thoroughly. So put this in the microwave and heat it for, oh, about 45 seconds. Then stir it thoroughly with a spoon.
While it's heating, move to the mixing bowl and mix the dry ingredients thoroughly. You can do this by hand, or perhaps your mixer has a balloon whisk attachment. If it does, set the mixer speed to about halfway, and run it for 30 seconds or so. Then use a fork to mix in the dry ingredients at the edge of the bowl, because the balloon whisk probably won't cover everything. Then run the mixer for another 30 seconds.
Now it's time to connect the dough hook to the mixer. Then start the mixer at the next-to-lowest speed. Sloooowly (as slowly as you can), add the canola oil to the mixing bowl. Then, again sloooowly, add the water / honey mixture.
Then let the mixer run for a full three minutes. Don't rush it. The full 180 seconds.
Then empty the dough onto the kitchen scale. Place half of the dough into one baking pan, and the other half in another pan. Press the dough so the top surface is pretty much flat and even.
Set aside the two pans.
Go back and do this with the other batch.
Now. What's this about 120 g or 122g of canola oil? In the first batch, when you pour it into the mixing bowl, about 2 g will remain on the sides of the cup. In the second batch, it's the same 2 g that remain there. So weigh out 122 g canola oil for the first batch, and 120 g for the second.
Spray the loaves with water. Then place all four loaves into a cold oven. Let them sit there for 36 minutes. For the first, oh, 120 seconds or so, turn on the oven. After those first 120 seconds or so, turn it off. You may want to experiment with the 120 seconds part. You may find that it varies depending on the season.
After the 36 minutes, remove the loaves. Punch each loaf down, then flip it over in the pan and press the dough so the top surface is pretty much flat and even. Spray the loaves with water and put them in the oven.
This time, let the loaves rise for 26 minutes (not 36), and turn on the oven for the first 60 seconds or so only.
After the 26 minutes, remove the loaves, and punch, flip, and press down each loaf as before. But wait! We're not quite ready to put the loaves into the oven for the third rise.
For each newly-pressed-down loaf, remove it a second time from the pan. Line the pan with margarine (or butter), using a frozen stick of margarine like a pencil. Then flip the dough again into the pan and press it down again.
I've had problems with the baked loaves having large holes in some of the slices, and this double flipping and double flattening before the third rise helps eliminate that problem.
Place the loaves in the oven, without spraying with water this time.
Ok, third rise. 36 minutes, like the first rise, and turn on the oven for the first 60 seconds or so.
After the third rise, remove the loaves from the oven. Heat the oven to 350 degrees. When it's hot, place the loaves in the oven, spacing them out a bit so the air can flow between them.
45 minutes. Experience may teach you to vary this a bit.
Remove the loaves from the oven. Let them sit for about 10 minutes. Then turn them out of the baking pans. Let them sit for at least an hour. You can actually let them sit for several hours before slicing, if you want to take a nap. A nap is highly recommended.
You know what to do.
I remember the days of manual typewriters with cloth ribbons. In God's heaven, each character in each printed document will be the same width. If I could have published this page with ink filling the top half of each "e", I would have. If at random points I could have caused an initial capital letter to appear just a tad too high, I would have. The end of each sentence not at the end of a paragraph should be followed by two spaces, not one. Because tradition, that which has been handed down.
Photograph by Susan Eileen Evans.